Friday, January 09, 2015

A Smattering of Links and Other Stuff

Registry
Well, 2014 ended with just one submission for the WRA 2/e Contest.  That's unfortunate, but it doesn't alter my effort in updating the book in any way.  For me, this book will be something to look forward to in 2015, and something I'm pretty excited about, in part because I'll be presenting more information about the analysis processes I've been using, processes that have led to some pretty interesting findings regarding various incidents and malware.

In other Registry news, Eric Zimmerman has created an offline Registry parser (in C#) and posted it to GitHub.  Along with Eric's Shellbag Explorer tool, it really seems as if his interest in the Windows Registry is burgeoning, which is great.  Hopefully, this will generate some of the same interest in others.

Tools
Willi has a new tool available called process-forest, which parses event ID 4688 records within the Security.evtx file to develop a process tree.  If you have the necessary auditing enabled, and have increased the default size of your Security Event Log, this tool will provide you with some great data!

Tool Updates
Speaking of the Registry, I've made some updates to several of my tools.  One was to extend the inprocserver.pl plugin by creating a RegRipper plugin (fileless.pl) that could be used to scan any hive file for indications of "fileless" malware, such as Phasebot or Poweliks.  My testing of this plugin was limited, but it works for other search criteria.

I've also made some minor updates to other tools.

Widening the Aperture through Sharing
I was doing some reading recently regarding attribution as a result of DFIR analysis, which included Richard's recent post. From there, I followed the link to Rid and Buchanan paper (PDF), which was fascinating reading.  I took a lot of what I read and applied it to my thinking on threat intel in general, and not just to attribution.  One of the things I've been noodling over is how to widen the aperture on the indicators that we initially collect/have access to, and how that relates to the incident response process.

One of the big things that immediately jumped into my head was "sharing".

Secureworks Research Blog post
Speaking of sharing, this article (titled "Sleeper Agents") was published recently on the Dell Secureworks Research Blog.  It's a great example of something seen in the wild, and

Sharing Indicators
Continuing with the sharing theme, @binaryz0ne posted an article to his blog regarding artifacts of user account creation, looking at differences between the use of the command line and GUI for creating local accounts on a system (i.e., not AD accounts).

A couple of things to point out...

First, this testing is for account creation.  The accounts are being created, but profiles are not created until someone logs in using the credentials, as mentioned by Azeem.

Second, if you were interested in just account creation information, then collecting ALL available timeline information might be time consuming.  Let's say you found the event log record for account creation and wanted to focus on just that aspect of analysis.  Using the "Sniper Forensics" principles, you could create a timeline from just the Windows Event Logs (Security, LocalSessionManager, RemoteConnectionManager, maybe even TaskScheduler, just in case...), the SAM Registry hive (samparse_tln.pl RegRipper plugin), prefetch files (if available), and the user's (account collected from Windows Event Log record) NTUSER.DAT and USRCLASS.DAT.

I've seen instances of both (use of CLI and GUI to create accounts...) in the wild, and it's great to see someone putting in the effort to not only test something like this, but to also share their findings.  Thanks, Ali!

I've been doing some testing of Powershell, and have been using a .ps1 file to create a user and add it to the local Administrators group, and finding some truly fascinating artifacts.

Python
One of the things I've been working on (well, working off and on...) is learning to program in Python.  I do plan to maintain my Perl programming, but learning Python is one of those things I've laid out as a goal for myself.  I've already written one small program (destlist.py) that I do use quite often for parsing the DestList streams out of automaticDestination Jump Lists, including adding that information to a timeline.  I don't expect to become an expert programmer, but I want to become more proficient, and the best way to do that is to start developing projects.

Not long ago, I was doing some reading and ran across this ISC post that mentions the impacket library (from CoreLabs), and I thought that was pretty interesting.  Not long after, I was reading Jon Glass's blog and ran across another mention of the impacket library, and solutions Jon has been looking at for parsing the IE10+ WebCacheV01.dat history database (part 3 of which can be found here).  I've been pretty successful using the NirSoft ESE Database Viewer so far, but like Jon, I may reach the point where I'd like to have something that I can extend, or better yet, provide output in a format that I can easily incorporate into my analysis processes.

Monday, January 05, 2015

What It Looks Like: Disassembling A Malicious Document

I recently analyzed a malicious document, by opening it on a virtual machine; this was intended to simulate a user opening the document, and the purpose was to determine and document artifacts associated with the system being infected.  This dynamic analysis was based on the original analysis posted by Ronnie from PhishMe.com, using a copy of the document that Ronnie graciously provided.

After I had completed the previous analysis, I wanted to take a closer look at the document itself, so I disassembled the document into it's component parts.  After doing so, I looked around on the Internet to see if there was anything available that would let me take this analysis further.  While I found tools that would help me with other document formats, I didn't find a great deal that would help me this particular format.  As such, I decided to share what I'd done and learned.

The first step was to open the file, but not via MS Word...we already know what happens if we do that.  Even though the document ends with the ".doc" extension, a quick look at the document with a hex editor shows us that it's format is that of the newer MS Office document format; i.e., compressed XML.  As such, the first step is to open the file using a compression utility, such as 7Zip, as illustrated in figure 1.

Figure 1: Document open in 7Zip


As you can see in figure 1, we now have something of a file system-style listing that will allow us to traverse through the core contents of the document, without actually having to launch the file.  The easiest way to do this is to simply extract the contents visible in 7Zip to the file system.

Many of the files contained in the exported/extracted document contents are XML files, which can be easily viewed using viewers such as Notepad++.  Figure 2 illustrates partial contents for the file "docProps/app.XML".

Figure 2: XML contents


Within the "word" folder, we see a number of files including vbaData.xml and vbaProject.bin.  If you remember from PhishMe.com blog post about the document,  there was mention of the string 'vbaProject.bin', and the Yara rule at the end of the post included a reference to the string “word/_rels/vbaProject.bin”.  Within the "word/_rels" folder, there are two files...vbaProject.bin.rels and document.xml.rels...both of which are XML-format files.  These documents describe object relationships within the overall document file, and of the two, documents.xml.rels is perhaps the most interesting, as it contains references to image files (specifically, "media/image1.jpg" and "media/image2.jpg").  Locating those images, we can see that they're the actual blurred images that appear in the document, and that there are no other image files within the extracted file system.  This supports our finding that clicking the "Enable Content" button in MS Word did nothing to make the blurred documents readable.

Opening the word/vbaProject.bin file in a hex editor, we can see from the 'magic number' that the file is a structured storage, or OLE, file format.  The 'magic number' is illustrated in figure 3.

Figure 3: vbaProject.bin file header


Knowing the format of the file, we can use the MiTeC Structured Storage Viewer tool to open this file and view the contents (directories, streams), as illustrated in figure 4.

Figure 4: vbaProject


Figure 5 illustrates another view of the file contents, providing time stamp information from the "VBA" folder.

Figure 5: Time stamp information


Remember that the original PhishMe.com write-up regarding the file stated that the document had originally been seen on 11 Dec 2014.  This information can be combined with other time stamp information in order to develop an "intel picture" around the infection itself.  For example, according to VirusTotal, the malicious .exe file that was downloaded by this document was first seen by VT on 12 Dec 2014.  The embedded PE compile time for the file is 19 June 1992.  While time stamps embedded within the document itself, as well as the PE compile time for the 'msgss.exe' file may be trivial to modify and obfuscate, looking at the overall wealth of information provides analysts with a much better view of the file and its distribution, than does viewing any single time stamp in isolation.

If we continue navigating through the structure of the document, and go to the VBA\ThisDocument stream (seen in figure 4), we will see references to the files (batch file, Visual Basic script, and Powershell script) that were created within the file system on the infected system.

Summary
My goal in this analysis was to see what else I could learn about this infection by disassembling the malicious document itself.  My hope is that the process discussed in this post will serve as an initial roadmap for other analysts, and be extended in the future.

Tools Used
7Zip
Notepad++
Hex Editor (UltraEdit)
MiTeC Structured Storage Viewer

Resources
Lenny Zeltser's blog - Analyzing Malicious Documents Cheat Sheet
Virus Bulletin presentation (from 2009)
Kahu Security blog post - Dissecting a Malicious Word document
Document-Analyzer.net - upload documents for analysis
Python OLETools from Decalage
Trace Evidence Blog: Analyzing Weaponized RTF Documents

Addendum 6 Jan 2015 - Extracting the macro
I received a tip on Twitter from @JPoForenso to take a look at Didier Stevens' tools zipdump.py and oledump.py, as a means for extracting the macro from the malicious document.  I first tried oledump.py by itself, and that didn't work, so I started looking around for some hints on how to use the tools together.  I eventually found a tweet from Didier that had illustrated how to use these two tools together.  From there, I was able to extract the macro from within the malicious file.  Below are the steps I followed in sequence to achieve the goal of extracting the macro.

1. "C:\Python27>zipdump.py d:\tips\file.doc" gave me a listing of elements within the document itself.  From here, I knew that I wanted to look at "word/vbaProject.bin".

2.  "C:\Python27>zipdump.py -d d:\tips\file.doc word/vbaProject.bin" gave me a bunch of compressed stuff sent to the console.  Okay, so good so far.

3.  "C:\Python27>zipdump.py -d d:\tips\file.doc word/vbaProject.bin | oledump.py" gave me some output that I could use, specifically:
  1:       445 'PROJECT'
  2:        41 'PROJECTwm'
  3: M   20159 'VBA/ThisDocument'
  4:      3432 'VBA/_VBA_PROJECT'
  5:       515 'VBA/dir'

Now, I've got something I can use, based on what I'd read about here.  At this point, I know that the third item contains a "sophisticated" macro.

4.  "C:\Python27>zipdump.py -d d:\tips\file.doc word/vbaProject.bin | oledump.py -s 3 -v" dumps a bunch of stuff to the console, but it's readable.  Redirecting this output to a file (i.e., " > vba.txt") lets me view the entire macro.

Addendum 14 Jan 2015 - More Extracting the Macro
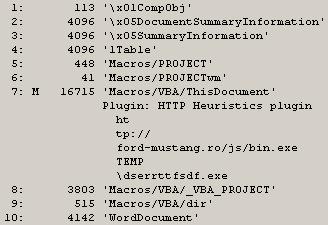
Didier posted this following image to Twitter recently, illustrating the use of oledump.py: